Turn a dull fence or balcony into a lush vertical garden wall with this step-by-step DIY guide. Learn how to plan, build, and maintain your own green wall—no landscaper needed.
How I Turned a Bare Fence into a Lush Green Backdrop
I used to ignore the back fence. It was just there—a blank, boring wall that didn’t add anything to the yard. But after spending one too many evenings staring at it while sipping tea, I started imagining what it could be. Not just a fence, but a living wall. Something that added texture, color, and life to the space.
I didn’t have a huge budget or a landscaper on speed dial. Just a free weekend, a few tools, and the urge to make my backyard feel more like a retreat.
Here’s exactly how I built my vertical garden wall—and how you can do it too.
Step 1: Pick the Right Wall
Not every wall works for a vertical garden. I chose a section of my wooden fence that gets morning sun and is visible from the seating area. It’s sturdy, easy to reach, and has enough space to experiment without feeling overwhelming.
Before you start, ask yourself:
- Does the wall get enough sunlight for the plants you want?
- Is it strong enough to hold weight?
- Will you be able to water and maintain it easily?
- Is it somewhere you’ll actually see and enjoy? DIY Backyard Makeover: From Lawn to Lounge
Step 2: Choosing the Style That Actually Fits
I didn’t want something complicated. Just a setup I could build myself, tweak if needed, and not feel overwhelmed by. So I spent a couple of evenings scrolling through garden blogs and DIY forums, looking for ideas that felt doable—not Pinterest-perfect. 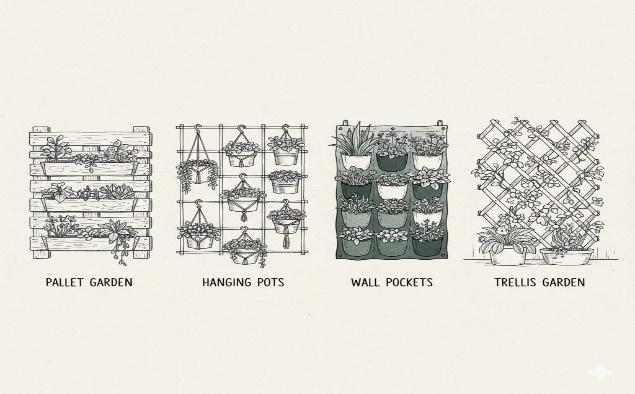
Eventually, I landed on a wooden grid with hanging terracotta pots. It felt right. Simple enough to build, flexible if I wanted to swap out plants, and it wouldn’t dominate the space.
If you’re working with a balcony or a smaller wall, you might prefer fabric pockets or lightweight planters. The key is to pick something that suits your space and your energy level—not just what looks trendy Budget-Friendly Patio Furniture Ideas
Step 3: Gathering What You Actually Need
I didn’t go all out with fancy materials. Most of what I used came from the local hardware store and garden center—things I could carry myself and didn’t need a truck for.
Here’s what I ended up using:
- A few treated wooden slats (cut to size at the store)
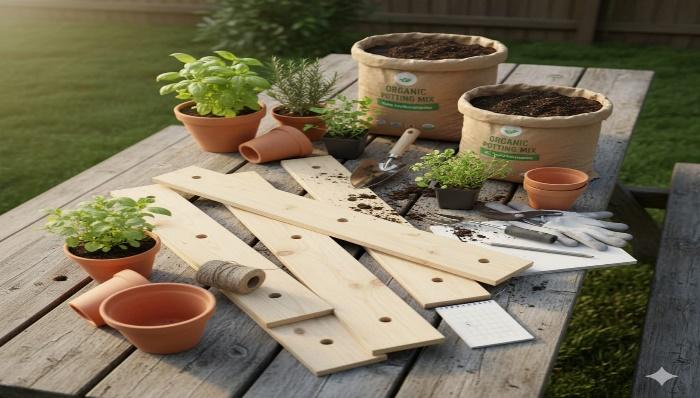
- Terracotta pots with metal hooks
- Screws, brackets, a drill, and a level
- Potting soil mixed with compost
- Plants I actually use: mint, basil, lavender, and ivy
- Optional stuff I skipped at first: irrigation tubing, landscape fabric
I didn’t buy everything at once. I started with the basics, then added more as the project came together. Essential Materials for Home Renovation Projects
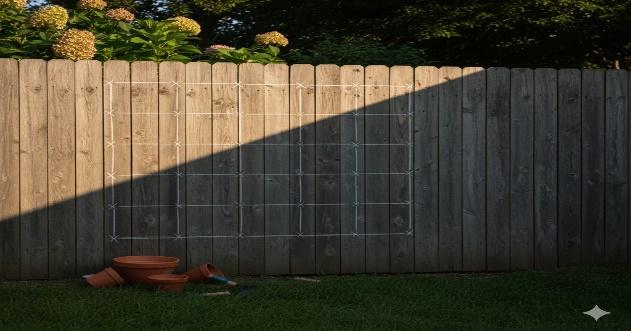
Step 4: Build and Mount the Frame
I built a simple wooden grid and mounted it to the fence using brackets. It took about two hours, including measuring, cutting, and drilling. 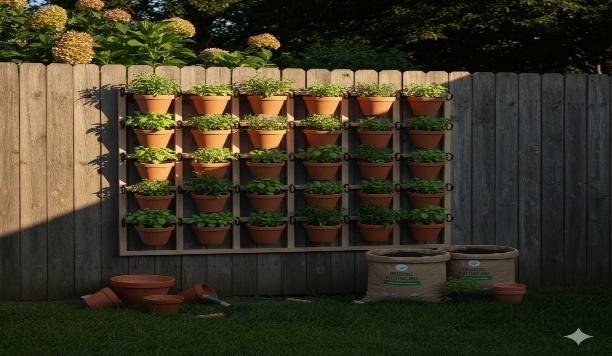
Tips that helped:
- Use a level to keep everything straight
- Leave space between rows for plant growth
- Pre-drill holes to avoid splitting the wood
- Test the weight before adding soil and plants
Step 5: Choose Your Plants
This part was fun—and a little overwhelming. I wanted a mix of texture, scent, and function. So I picked herbs I actually use, plus a few trailing plants for softness.
Here’s what worked for me: 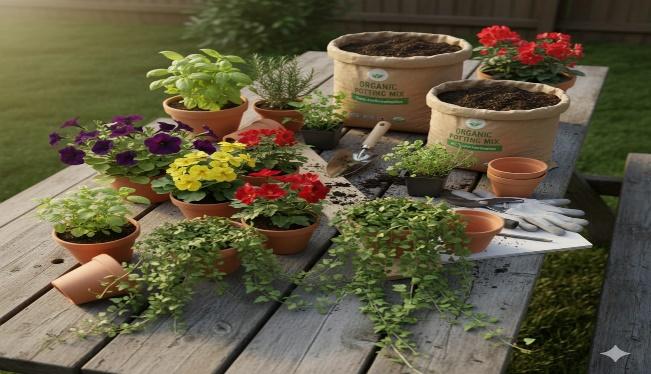
- Herbs: basil, mint, thyme, oregano
- Flowers: petunias, marigolds, pansies
- Greens: lettuce, spinach, arugula
- Vines: ivy, creeping Jenny, sweet potato vine DIY Tool Storage and Organization Ideas
Step 6: Planting—The Part That Feels Real
This was the moment it stopped being a “project” and started feeling like a garden. I sat on the ground, opened the soil bags, and planted each pot slowly. No rush. Just me, the plants, and a bit of trial and error. 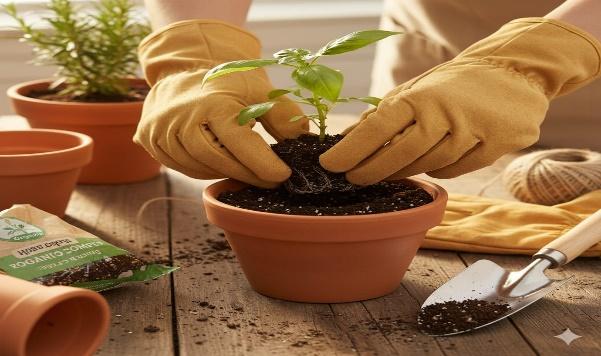
I didn’t fill the pots to the brim—I learned that the hard way with one overflowing mess. I grouped herbs together, kept the trailing plants on the edges, and labeled everything because I always mix up oregano and thyme.
It wasn’t perfect, but it felt good. Like I was building something alive.
Step 7: Watering and Keeping It Alive
I didn’t install a fancy irrigation system. Just a watering can and a bit of routine. Every couple of days, I’d check the soil with my finger—if it felt dry, I watered. If not, I left it alone. 
Some plants needed more attention than others. The mint was a drama queen, wilting if I skipped a day. The ivy? Chill. Didn’t care much either way.
I trimmed dead leaves when I saw them, moved pots around when they looked unhappy, and added a bit of organic fertilizer once a month. It became part of my rhythm—not a chore, just something I did while sipping coffee.
Step 8: Making It Yours
Once the plants settled in, I realized the wall still felt… functional. So I added a few personal touches: painted one of the pots, hung a tiny wooden sign that said “Grow Wild,” and strung up solar fairy lights.
Suddenly, it wasn’t just a garden—it was mine. A little messy, a little quirky, but full of personality.
You don’t need to go overboard. Even one painted pot or a string of lights can shift the vibe completely.
Step 9: Fixing What Doesn’t Work 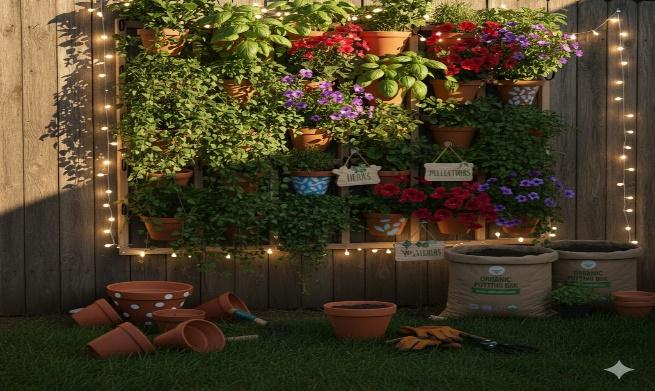
Let’s be honest—not everything went smoothly. One of the hooks snapped. A pot fell and cracked. A plant died within a week. But I didn’t panic. I just adjusted.
I replaced the hook, moved the heavier pots lower, and swapped out the dead plant for something hardier. It’s a living wall—things change. That’s part of the charm.
If something feels off, fix it. If a plant isn’t thriving, try a new one. This isn’t a static decoration—it’s a space that grows with you.
Final Thoughts
Creating a vertical garden wall isn’t just about saving space—it’s about adding life. I turned a dull fence into a green backdrop that smells amazing, looks beautiful, and actually feeds me.
You don’t need a huge yard or a big budget. Just a wall, a few tools, and a plan.
Start small. Choose plants you love. And let your garden grow upward.
Turn a dull fence or balcony into a lush vertical garden wall with this step-by-step DIY guide. Learn how to plan, build, and maintain your own green wall—no landscaper needed.